
The Service Bureau takes multiple steps to ensure that colors stay consistent from print to print. By calibrating our machines and monitors often, and using the same profiles and settings, we can achieve a consistent, accurate prints.
Below is information about color profiles we recommend for our services, how to attach color profiles to your file when saving, how to calibrate your monitor, and how to Soft Proof your work and then convert it for a specific printer.
Computer Stations with color calibrated monitors are available down the hall from the service bureau, it is recommended that you check your files there first before submitting an order
A print viewing area with daylight and tungsten balanced lights is setup near the Service Bureau for evaluating prints.

THINK ABOUT YOUR DESIRED OUTPUT METHOD WHEN SETTING UP YOUR FILE
Color Laser Printing (CMYK)
Calibration Schedule – a daily series of tests & calibrations to maintain the closest possible reproduction.*
Profile – GRACoL2006 Coated 1
*Due to the nature of color laser printing, colors will shift throughout the day and from day to day. We are unable to exactly match prints made at separate times. Not all visible elements are able to be printed, some vibrant colors and gradients are not able to be rendered. Using the recommended PDF export settings & color profile with help get the closet possible print.
Wide Format Inkjet Printing (RGB)
Calibration Schedule – Custom-made paper-specific profiles are made before each semester. Nozzle checks are performed before each print job to ensure full color output.
Profile – AdobeRGB(1998)
Attaching Profiles for Printing
- It is best to setup your file with the desired output profile when you first start working
- When saving your files you should always double check that the color profile is attached
- For TIFF files this is in the Save dialog box
- For PDF files we recommend using the PDFX1a:2001 Preset (Click for PDF Settings). Under the ‘Output’ section choose ‘No Color Conversion’ and ‘Include All Profiles’
Monitor Calibration
Monitors are not inherently programmed to check color accuracy. Colors shift over time, and while some monitors are better at maintaining color accuracy, all monitors need to be calibrated.
How to: To properly calibrate your monitor you need an Eye One Calibrating Puck. You can check one out at any of the 3 Media Centers on campus. The Eye One does most of the work for you and the kit will include directions. Just be sure that your settings are as follows:
Temp: 6500K
Gamma: 2.2
How often: Desktops – once a week. Laptops – as often as possible. Any time the lighting situation where you’re working changes, you should recalibrate.
What Profile Does my Image Have?
****These directions are specific to Inkjet Printing only. Calibrating your screen is a good idea either way.
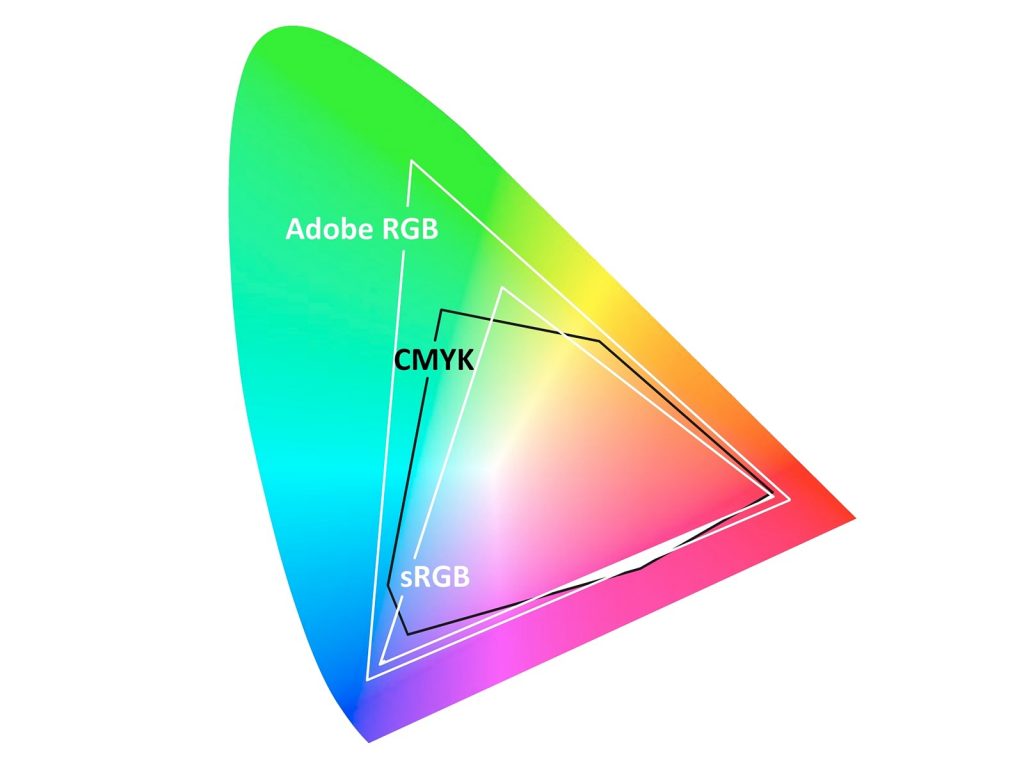
Every image has an assigned color profile that limits the number of colors in that image. Ideally, you want to start with the larges color profile possible and only reduce or change that profile when absolutely necessary. Here are some of the common color profiles from the largest (with the most possible colors) to the smallest.
 >
>  >
> 
To find out what color profile your image is currently using open the file in Photoshop and go to the bottom left hand corner of the screen.
Click the arrow to open up a menu of info available on the image.
Right now we are looking at the Document Size.
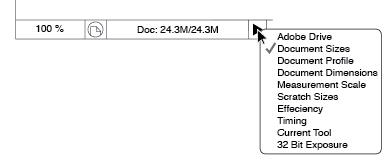
Click “Document Profile” to see your current profile.
The Service Bureau uses AdobeRGB(1998) for Inkjet prints. If your file is not that you will need to convert it. 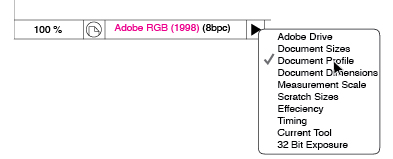
Soft Proofing
Converting your file to a different color profile changes the way it looks, sometimes dramatically. By Soft Proofing your file you can see how your image will look without permanently changing it.
How to Soft Proof for Inkjet Printing at the Service Bureau
Open your image in Photoshop
Go to View>Proof Setup > Custom
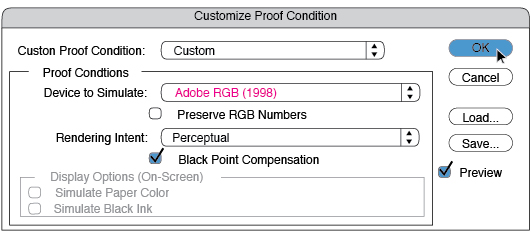
Preserve RGB Numbers – OFF
Rendering Intent – Perceptual (photographic) or Relative Colormetric (graphics) *** whatever looks best
Black Point Compensation – ON or OFF, whatever looks best ****
*** There are two other Rendering Intents, Absolute and Saturated. These are not compatible with our printers and will make your images look strange.
**** If you are printing on a matte paper, you want to turn Black Point Compensation OFF.
Convert to Profile
Converting to your final profile permanently moves your image into that color space. It’s the last step before saving the file to be printed.
How to Convert Your File for Printing at the Service Bureau
Open your file in Photoshop
Go to Edit > Convert to Profile…
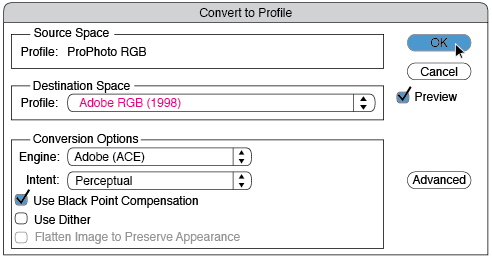
Profile: Adobe RGB(1998)
Engine: Adobe (ACE)
Dither: OFF
Use the same settings you used in Soft Proof for Intent and Black Point Compensation.